Skype for Business
Overview
Skype for Business (Microsoft) is a powerful way to instantly communicate with KU students and colleagues, as well as others around the world. With the click of a button you can open a text chat, make a voice or video call, or even start an online meeting.
Skype for Business makes online communication more collaborative and engaging. And, you can use Skype for Business from nearly any computer or mobile device, on campus or anywhere in the world you have Internet access. Skype for Business directly integrates with other services provided by KU IT including Outlook, OneNote and SharePoint.
Skype for Business is available for both Windows and Mac computers. Skype for Business is not available for Linux operating systems.
Sign-in to Skype
PC
After your initial sign-in, Skype for Business will automatically launch upon startup for PC users unless you manually sign out.
To sign in:
- Launch Skype for Business by selecting the Start Menu and searching for Skype for Business.
- Select Skype for Business in the search results.
- In the Sign-in Address field, enter your primary KU email address.
- Click Sign-in.
Completing the steps above should be enough to sign you in, however, if prompted you will need to complete the following steps to finish signing-in.
- In the Username field, enter your KU Online ID followed by @home.ku.edu(KUOnlineID@home.ku.edu).
- In the Password field, enter your KU Online Password.
Note: After changing your password, you may be prompted to enter your Exchange credentials. Refer to this knowledgebase article for instructions on how to sign in.
Mac
When signing-in to Skype for Business your first time, remember to select the checkbox for "Keep me signed in" so that you will be automatically signed-in when Skype launches.
To sign in:
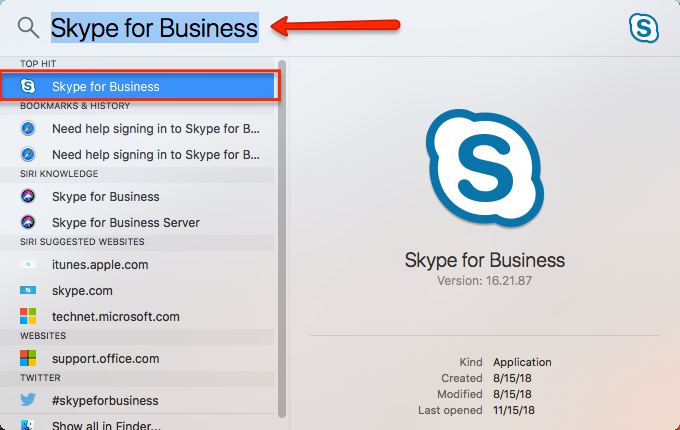
- Use Cmd + spacebar to launch the Spotlight Search and enter Skype for Business.
View ScreenshotMac sign-in. - Choose Skype for Business in the search results.
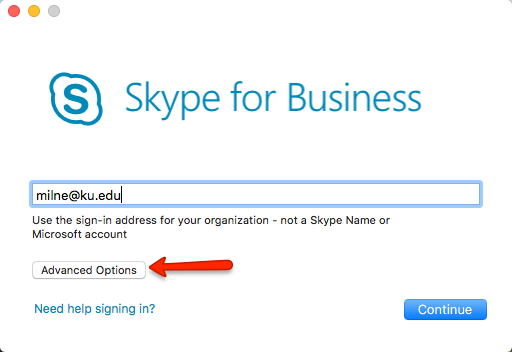
- In the Email address field, enter your Primary KU email address. For example, "ImaJayhawk@ku.edu."
- Select Advanced Options.
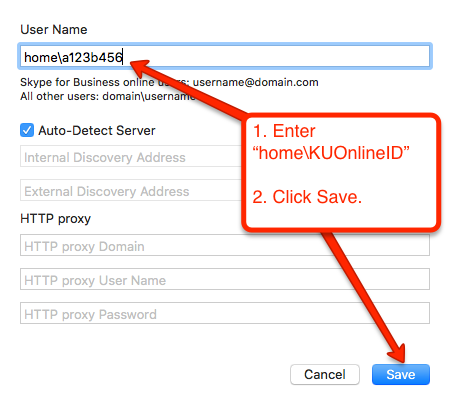
View ScreenshotSelect Advanced Options button below sign-in field. - In the Username field, enter the domain (home) followed by a backslash (\) and your KU Online ID. For example, "home\a123b456."
View ScreenshotEnter home\KUOnlineID, then select Save. - Select Save.
- Select Continue and in the password field, enter your KU Online Password.
- Select Sign In.
Mobile Device
These instructions are the same for both iOS and Android devices.
To sign in:
- Install the official Skype for Business mobile app from the Apple App Store or the Google Play store.
- Launch the app, and enter your primary KU email address sign in screen.
- Click on Advanced Options.
- In the Username field, enter the domain (home) followed by a backslash (\) and your KU Online ID.
View ScreenshotEnter home\KUOnlineID, then select Save. - Close the advanced options to return to the main sign-in screen.
- Enter your KU Password
- Click the arrow to sign-in.
Note: If asked for a phone number, your mobile number will be filled in by default. Replace the number with your KU issued phone number.
Skype Enabled Phone
Your local tech support staff should sign you into your desktop phone when you first receive it. If you should get logged out, you can sign in either using your KU email, Online ID, and password. Or, you can sign in by setting up and using a Skype PIN, which is the generally easier method. Note: Your Skype PIN is different from your voicemail PIN although you can make them identical.
If you are a student employee (not a GRA, GTA, GA), your tech support will need to log you in to your phone.
Types of Phones
There are two types of Skype-enabled phones recommended, you should have one of the following models. Please note which model you have to know which instructions to follow.
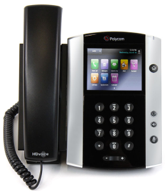
View ScreenshotPolycom VVX 501 Touch Screen Phone.
To sign in using your Skype PIN:
Note: Your Skype PIN is different from your voicemail PIN although you can make them identical.
Set up your Skype PIN:
- Go to LyncPin Management.
- Select the Sign In link.
- Select the Sign In button.
- In the dialog box by User Name, enter your KU Online ID. Note: If using Safari or a mobile device you may have to enter the username as home\KUOnlineID
- By Password, enter your KU password.
- Once logged in, enter and re-enter a 6-to 24-digit PIN. TIP: For simplicity, you may want to make this PIN the same as your voicemail PIN.
- Click Log out.
Sign in to your phone:
- Press the button under Sign In.
- Press 2 or use the physical navigation disc to scroll and select 2 PIN Authentication…
- By Extension, enter 4 followed by your four-digit extension (4####).
- Use the physical navigation disc to advance to the next field.
- In PIN, enter your Skype PIN.
- Press the button below Sign In.
- If you successfully signed in, you will see a confirmation screen. You can press done or it will disappear after several seconds. You will see your name appear by the phone after icon on the screen. Any contacts that you’ve added as Favorites on your Skype for Business contact list will appear.
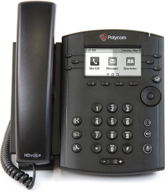
View ScreenshotPolycom VVX 311 Button Phone.
To sign in using your Skype PIN:
Note: Your Skype PIN is different from your voicemail PIN although you can make them identical.
Set up your Skype PIN:
- Go to LyncPin Management.
- Select Sign In.
- Select the Sign In button.
- In the dialog box by User Name, enter your KU Online ID. Note: If using Safari or a mobile device you may have to enter the username as home\KUOnlineID
- By Password, enter your KU password.
- Once logged in, enter and re-enter a 6-to 24-digit PIN. TIP: For simplicity, you may want to make this PIN the same as your voicemail PIN.
- Select Log out.
Sign in to your phone:
- Press the button under Sign In.
- Press 2or use the physical navigation disc to scroll and select 2 PIN Authentication…
- By Extension, enter 4 followed by your four-digit extension (4####).
- Use the physical navigation disc to advance to the next field.
- In PIN, enter your Skype PIN.
- Press the button below Sign In.
- If you successfully signed in, you will see a confirmation screen. You can press done or it will disappear after several seconds. You will see your name appear by the phone after icon on the screen. Any contacts that you’ve added as Favorites on your Skype for Business contact list will appear.
Skype Web App
Find sign-in instructions and more information on using the Skype Web App, use the left navigation to jump to Skype Meetings instructions. .
Manage Contacts
You can find, add and remove contacts to your Skype for Business contact list and create groups to manage and organize those contacts.
PC
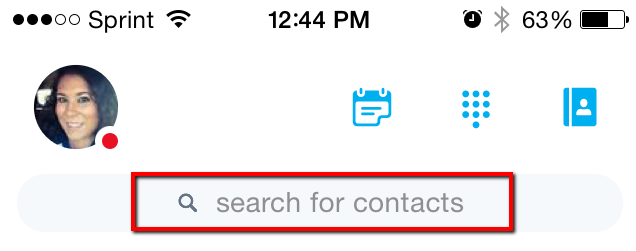
The quickest way to find someone via Skype for Business is to type the person’s last name in the search box on the contacts window. The results display automatically.
- Department
- Title
- Distribution list – You can add distribution lists with less than 100 members to your contacts list.
Add a KU contact to your Skype for Business contacts list
Your contacts list makes it easy to see who is available, their location, and how you can contact that person. Add the people you communicate with the most.
Add a contact:
- In the search window, type the last name, title or department of the person you want to add. The search results will automatically appear below the search bar.
- Right-click the person’s listing, choose Add to Contact List, and choose a group to add your new contact to. By default, you will only have one group to choose called “Other Contacts.” See Create groups for you contacts to learn how to add new groups.
Add a non-KU number to your Skype for Business contacts list
Although it is possible to add a phone number in the Skype for Business desktop interface as a contact, we recommend the following method of first creating an Outlook contact and then adding it to Skype for Business. This will display the contact by name rather than by phone number in your contacts list.
In Outlook
- Launch Outlook.
- Select Contacts.
- Select New Contact
- Provide a name for the contact.
- Enter a number for the contact formatting as (###) ###-####
- Select Save and Close.
In Skype for Business
- Launch Skype for Business.
- In the search box, enter the person's name as it appears in your Outlook contact list.
- The contact should appear in the search results.
- Choose Add to Contacts List and choose a group, or select Add to Favorites to add it to your Favorites group. (Adding a contact to your favorites group is how you can add the number as a short cut on a Skype-enabled phone.
Add a non-KU contact that has Skype for Business
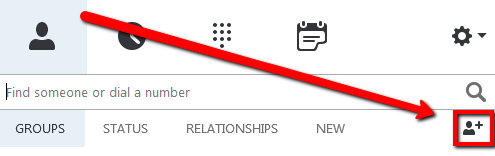
- Within Skype for Business, click on the Add Contact/Contact Group Button button.
View ScreenshotTo add a someone, select the person with plus sign. - Hover over Add a Contact Not in My Organization and select Skype for Business or Skype.
- Type the person’s IM Address. Skype for Business will give you a symbol verifying it is an actual address.
- Select a Contact Group and Privacy Relationship to give the contact. By default, the contact will be given the External Contacts privacy relationship and won’t be able to view your presence information.
- Then select OK.
Group Contacts
You can set up a group for each team you work with so you can see at a glance who’s available at any given time, or communicate with the entire team at once.
To create a new group
- In the Skype main window, click the Add a Contact button.
View ScreenshotTo add a someone, select the person with plus sign. - In the drop-down menu, select Create a New Group.
- A new entry box will appear at the bottom of your contacts list. Type over the phrase New Group to give your group a name. Press enter on the keyboard to set it.
TIP: You can send an instant message to an entire group by right clicking on the group name and selecting Send an IM.
Placing contacts in groups
You have several options for adding a contact to a group.
- If the person is not in your contacts list, you can search for them by last name, right-click their contact. Then, choose Add to Contacts List and select the Group Name.
- You can drag and drop a contact from one group to another.
- You can right-click on a contact in your contacts list and choose Move Contact To or Copy Contact To and select the new group.
TIP: You can have one contact in multiple groups.
Tagging Contacts
Skype for Business can notify you when a contact's status changes; so if the contact is busy, you know when they become available.
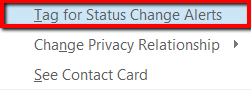
To tag a contact:
- In your contacts list, right-click a contact
- Click Tag for Status Change Alerts.
View ScreenshotPolycom VVX 501 Touch Screen Phone.
To un-tag a contact
- Right-click the contact.
- Deselect Tag for Status Change Alerts. Alternatively, when you are alerted that the contact’s status has changed, you can select Un-tag from the notification box.
Mac
Find a Contact
The quickest way to find someone via Skype for Business is to type the person’s last name in the search box on the contacts window. The results display automatically.
You can also search by:
- Department
- Title
- Distribution list – You can add distribution lists with less than 100 members to your contacts list.
Add a KU contact to your Skype for Business contacts list
Your contacts list makes it easy to see who is available, their location, and how you can contact that person. Add the people you communicate with the most.
Add a contact
- Select Contacts from the left-hand menu.
- In the search window, type the last name of the person you want to add. The search results will automatically appear below the search bar.
- Right-click on the contact.
- Select a Group to add your new contact to, or select Add Contact if you do not have groups created.
- After you have searched, to hide the results, select the X in the search box.
Note: You don’t have to add a contact in order to communicate with them. Simply search for them in the Contacts tab, then select their name in order to see the communication options.
Create groups for people you regularly get in touch with
You can set up a group for each team you work with so you can see at a glance who’s available at any given time, or communicate with the entire team at once.
Create a new group
- Select an existing group on the Contacts tab in the main Skype for Business menu.
- Select Contacts from the top menu.
- Select New Group.
- In the space that opens up at the bottom of the window, type over the phrase New Group to give your group a name.
Rename a group
- Locate the group you’d like to rename.
- Right-click on the group and select Rename.
- Type the new group name and press Enter.
Contact Management
Types of Phones
There are two types of Skype-enabled phones recommended, you should have one of the following models: Polycom VVX 501 Touch Screen Phone or Polycom VVX 311 Button Phone. Please note which model you have to know which instructions to follow.
View ScreenshotTypes of phones.
Contacts
Contacts are added using the Skype for Business desktop application, in PC or Mac. Contacts and favorites will then appear on the main screen of the Skype-enabled phone.
Find a contact
Find a contact by one of the following methods:
- Select a favorite on your main screen by touching the contact or pressing the button beside the contact and lift the handset.
- On the VVX 501 (touch screen) phone, find anyone on your contacts list by lifting the handset, touching contacts, and swiping up to scroll through your contacts list. Touch the contact you'd like to call and touch "Dial."
- On the VVX 311 (button) phone, find anyone on your contacts list by lifting the handset and pressing the button under contacts. Use the physical navigation disk to scroll down to your contact and press the button under "Dial."
Favorites
Favorites are added through the Skype for Business desktop application, on PC or Mac, and appear on the home screen of your phone. For phones that are set up as department lines, you’ll need to get help from your department's tech support to set up favorites.
How to add favorite numbers to the phone’s home screen:
- Within the Skype for Business desktop interface, find a contact within your contact list or search for the contact.
- Right click on a contact.
- Choose Add to Favorites.
Note: Depending on how many lines you answer, the touch-screen model can show up to seven favorites and the button.
How to add a phone number to Favorites:
- Type the number in the search box either in the contact view or phone view of the Skype for Business desktop interface.
- Right click on the number and choose Add to favorites.
Mobile App
Within the Skype for Business mobile app, you are not able to add contacts to your contacts list. However, you can call contacts and send messages.
iPhone
- Start typing a person’s last name in the search box. Your search results will appear below the box. You can also scroll through your Skype for Business Contacts group to find the person you’re looking for.
View ScreenshotType name in search field.
iPad
- Tap the Contacts in the left navigation.
- Start typing a person’s last name in the search box. Your search results will appear below the box. You can also scroll through your Skype for Business Contacts group to find the person you’re looking for.
View ScreenshotType last name in search field.
Windows Phone
From the contacts screen, tap search. Start typing a person’s last name in the search box. The results appear below the box.
Android
Tap the Contacts icon, tap Search, and start typing a person’s last name in the search box. Your search results will appear below the box. You can also scroll through your Skype for Business Contacts group to find the person you’re looking for.
Instant Messaging
Connect Instantly
Instant messaging in Skype for Business makes quick conversations easy by allowing you to see a person or group's availability first. If conversations become more complex, you can easily add in voice or video.
PC
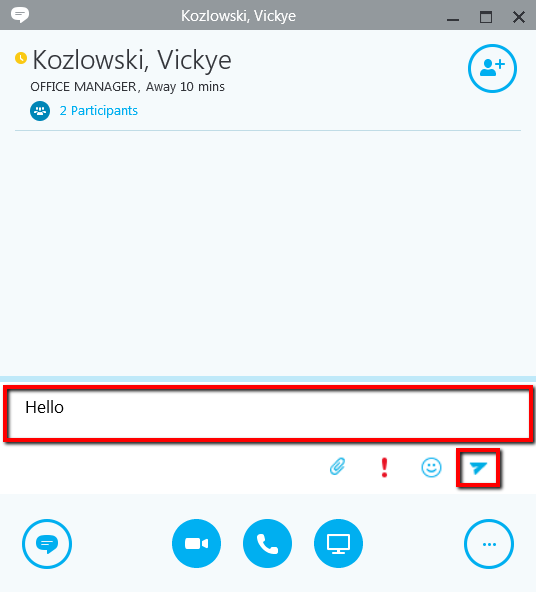
Send an Instant Message
- Locate the person you want to send an instant message to by finding their contact in Search or your Contacts list. Do one of the following.
- Hover over their presence icon (square with color) in the Contacts list or search results and click the IM button in the shortcut menu.
View ScreenshotSelect the person icon. - Double-click anywhere on their contact listing.
- Right-click their listing and select Send an IM.
- Hover over their presence icon (square with color) in the Contacts list or search results and click the IM button in the shortcut menu.
- Type your message at bottom of the conversation window.
View ScreenshotType last name in search field. - Press Enter or Return on your keyboard or select the Send button to send the message.
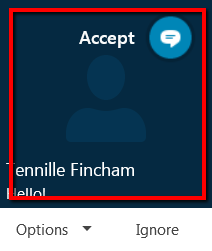
Answer an Instant Message
- Click anywhere on the blue area of the IM request pane.
View ScreenshotIM message request pane. - Type a response in the bottom of the conversation window.
View ScreenshotType last name in search field. - Press Enter or Return on your keyboard or select the Send button to send the message.
Share a File or Image
To send a file or image, do one of the following:
- Drag-and-drop a saved file into the text input area of an instant message. Then, hit Enter or Return on the keyboard or select the Send button to send it.
- Copy and paste a saved file or any image from an Office program into the text input area.
- Press the PrtScn button on your keyboard to capture an image directly from your screen, and then paste it into the text input area.
TIP: If you are in a group IM conversation, share the image by saving it, then clicking the Presentation Icon > Attachments tab > Insert Files (the file will be sent an icon that the recipient transfers to their computer to view), or by pasting it to an interactive Whiteboard.
Send a Group Message
You can send an instant message to multiple contacts using two methods:
- If they are in the same group. Right-click on the gray bar with the name of the group and select Send an IM.
- Hold down the Ctrl key and select multiple contacts or hold down the Shift key and select a series of contacts. Right-click and select Send an IM.
Invite Another Contact to a Conversation
Add others to the conversation by dragging their contact listing from your Contacts list into the conversation window or:
- Select the Invite more people button
View ScreenshotInvite more people using the icon of person with plus sign. - Select contacts from your contact list or using the search option.
- Select the contact from your contacts list or search for the contact by last name.
Add Voice to a Conversation
You can quickly add audio to your IM conversation by selecting the Telephone Button.
View ScreenshotPhone icon.
You can continue using Instant Message while you talk.
Add Video to a Conversation
You can quickly add video to your IM conversation by selecting the Camera Icon.
View ScreenshotCamera icon.
You can continue using Instant Message while you talk.
End a Conversation
When you’re done with an instant message conversation, select the Close button in the upper-left corner of the conversation window.
Mac
Send an Instant Message
- Locate the person you want to send an instant message to by searching in the Contacts tab or select from your Contacts list.
- Start an instant message in one of the following ways:
- Select the contact then, select the message icon in the window.
- Double-click anywhere on the contact listing.
- Hold down control on the keyboard and select the contact. Then, select Send an Instant Message.
- Type your message at bottom of the conversation window.
- Press Enter or Return on your keyboard to send the message.
Invite Another Contact to a Conversation
- Start an instant message conversation using one of the methods above.
- Select the person with the + icon.
- Search for a contact.
- Double-click on the contact’s name to add them to the conversation.
Add Voice and Video
Add Voice to a Conversation
You can quickly add audio to your IM conversation by selecting the Call Icon > Skype Call. You can continue using Instant Message while you talk.
Note: You can only add voice to an instant message when you are chatting with someone else logged into Skype for Business.
Add Video to a Conversation
You can quickly add video to your IM conversation by selecting the Camera Icon > Start Video. You can continue using Instant Message while you talk.
Note: Video can only be added to instant messages when you are chatting with someone else logged into Skype for Business.
End a Conversation
When you’re done with an instant message conversation, select the Close button in the upper-left corner of the conversation window.
Conversation History
By default, instant messages and voice and video call logs are available in Skype for Business and in an automatically generated folder in Outlook called Conversation History.
To view your conversation history in Skype for Business:
- Launch Skype for Business.
- Select Chats from the left menu.
To view your conversation history in Outlook:
- Launch Outlook or log in at the Office 365 Landing page.
- Look for a folder below your inbox called Conversation History.
Mobile App
iPhone
Send an Instant Message
- When you find the person you’re looking for, tap their name.
- Type a message, and then tap the send icon (paper plane).
Add Audio to an IM
When you’re in an IM and you want to call the contact, tap the Phone icon and then click one of the call buttons.
Add Video to an IM or Call
To add video to an IM or audio conversation, tap the Video icon, and then tap Start My Video.
iPad
Send an Instant Message
- When you find the person you’re looking for, tap their name.
- Type a message, and then tap the paper plane icon to send.
Add Audio to an IM
When you’re in an IM and you want to call the contact, tap the Phone icon and allow the app to access your microphone.
Add Video to an IM or Call
To add video to an IM or audio conversation, tap the Video icon, and allow the app to access your camera.
Windows Phone
Send an Instant Message
- When you find the person you’re looking for, tap their name, and then tap the send IM icon.
- Type your message, and then tap the Send icon.
Add Audio to an IM
When you’re in a IM and you want to call the contact, tap the Phone icon and then select the number you’d like to call.
Add Video to a Conversation
When you’re on a call and you’d like to add video to the call, tap the Video icon, and then select start my video.
TIP: You can also switch between your front and back cameras, by selecting switch camera.
Send an IM During a Video Call
- Tap the IM icon.
- Type your message and then tap the Send icon.
Android
Send an Instant Message
- When you find the person you’re looking for, tap their name, and then tap the IM icon to send an instant message.
- Type a message, and then tap Send.
Add Audio to an IM
When you’re in an IM and you want to call the contact, tap the Phone icon and then click one of the call buttons.
Add Video to a Conversation
- To add video to an IM or audio conversation, tap the Video icon.
TIP: You can also switch between your front and back cameras, by selecting switch camera.
Phone Calls
Voice and Phone Calls
You can use the Skype for Business desktop software to make calls to people both internal and external to KU. When you call others that are using Skype for Business, you will have full access to the Skype meeting features including video, screen sharing, and chat. When making calls to external phone numbers, you will only have access to call features including, hold, transfer, and mute.
PC Make Calls
Call by Contact or Username
- Find a contact or type a person’s name in the search box.
- Click on the contact's picture.
- Do one of the following:
- Click the Phone icon.
- Click the arrow next to the Phone icon and select a number.
Call by Phone Number
- From the contact or phone view, enter the phone number in the search box as the 10-digit number starting with the area code.
Note: For international numbers, enter the number as you would on a cell phone (011 ### phone number). - Press enter on the keyboard, or right-click and select Call.
- When you're finished with the call, click the red Phone button in the window to hang up, or just close the window.
Answering Calls
When you receive a voice call, you will see and hear a notification on your computer, as well as your Skype for Business-enabled phone if you have one. Where you answer the call will determine your audio device.
How to Answer a Phone Call
When someone calls you, an alert appears on your screen.
TIP: You must have your headset plugged into your computer in advance of receiving a voice or video call request. It does not work to plug in your headset when you receive the call.
- To answer the call, click anywhere in the blue area.
- Click Ignore to reject the call and send to voice mail.
- Click Options to do other actions:
- Send the call to Voice Mail.
- Click Mobile or Home to redirect the call. Note: You must first set up your mobile and phone numbers within Skype for Business to see this option.
- Reply by IM to send an instant message reply instead of audio or video. Note: If the person can’t receive an instant message because he/she doesn’t have Skype for Business launched, you will see a notification.
- Set to Do Not Disturb to reject the call and avoid other calls.
Call Ringing Options
There are a few options you can take advantage of to better hear and receive your calls. These include:
- Setting up a Secondary Ringer - incoming call notifications will play both on your headset and a secondary device that you choose.
- Setting up Call Forwarding - incoming calls will be forwarded to another number, contact, team, or go to voicemail.
- Setting up Simultaneous Ring - incoming calls made to your number will ring at your headset and computer speakers
You can choose for call forwarding and simultaneous ring to occur:
- All the time (default), or
- During work hours (set in Outlook).
You forward incoming calls by setting up forwarding rules. You can forward calls to:
- Voicemail, or
- Another number or to another contact, or a
- Delegate
You can also choose to delay the simultaneous ring so that it first rings for 5-10 seconds before ringing at another number, delegate, contact, or team.
Set-up a Secondary Ringer
If you have a headset plugged into your computer that you use occasionally for voice and video calls, you might miss audible notifications of incoming messages. When you set up a secondary ringer, the notification sound will play on both your headset and your device of choice, most likely your computer speakers.
- Launch Skype for Business.
- In the lower left corner of the interface, click on the drop-down by the icon with your audio device. Select Audio Device Settings.
- Toward the bottom of the panel, select the check box by Also ring and make sure your speakers are checked.
- Click OK to save.
Forwarding Calls
You have the option of forwarding all calls or individuals calls as you receive them to another number, such as your mobile phone. This is completely optional and is up to your discretion as it could involve your personal device and your personal phone plan.
Forward All Calls to Another Number:
- In the Skype for Business interface, click on the settings (gear) icon.
- Choose Call Forwarding from the left column.
- Choose your call forwarding option.
- Forward calls to will send all calls to the option chosen. Those calls will not "ring" on your machine.
- Simultaneously ring will make it so the calls ring both through the Skype for Business desktop software and the other option you choose.
- Optionally, you can choose to apply the settings:
- All the time
- During work hours set in Outlook
- Click OK to save the changes.
Forward Individual Calls to Another Number:
To forward individual calls to another number, you'll need to first set up the number (or numbers) in the Skype for Business desktop interface.
To Set Up Additional Numbers
- In the Skype for Business interface, click on the settings (gear) icon.
- Choose Phones.
- Choose the type of phone using the button and type the number. Enter it as the 10-digit number starting with the area code.
- Optionally, choose whether or not to show the number on your contact card (viewable to anyone using Skype for Business).
- Click OK to save.
Forward an Incoming Call
- When you receive a call, a notification will appear in the lower right corner of your screen.
- Click Options and choose the number that you'd like to forward the call to.
- The call will be forwarded.
Turn Off Call Forwarding
Select the call-forwarding drop-down menu and select Turn Off Call Forwarding.
Call Control Options
Audio Control Options During a Call
The call control options (Hold, Transfer, Devices, and number pad) should automatically appear in the middle of the call window when on a call with an external number. If you are on another call with someone at KU using Skype for Business, you may need to click on the grey phone icon to see those options.
How to Use the Audio Control Options:
- Use the dial pad to enter digits during the call to interact with voice-prompt menus.
- To put the call on hold, click Hold.
- To Mute, click the microphone button.
- To send the call to another number or park the call, click the Transfer button and select a contact or type a name or 10-digit phone number starting with the area code.
- To switch to a different device that is either connected to your computer or a built-in audio option, click the Devices button. Note: This option does not work to transfer a call to a Skype-enabled desk phone. You'll want to use Transfer > Park for that.
Transfer a Call
You can transfer a call to another contact at KU or to another number. An additional option you'll see when transferring is parking a call (more information below).
To transfer a call
- Click on Transfer. If you do not see this option, click on the grey phone icon and then click Transfer.
- Select a contact, or look up someone at KU by entering their last name followed by a comma and then first name in the search box, or enter the 10-digit phone number starting with the area code in the search box.
- Select the contact or number and then click Transfer.
Park a Call
When you park a call, the call is placed on hold and you are provided a three- or four-digit number that anyone using Skype for Business can use to retrieve the call. It can be a useful option if you want to switch from your headset that is connected to your computer to a Skype-enabled desk phone or if you pick up a call at the front desk and need to move to another workstation to continue the call. A few notes about parking:
- Only people using Skype for Business on PC or using a Skype-enabled desk phone can park a call.
- Only people using Skype for Business on PC, Mac, or a Skype-enabled desk phone can retrieve a parked call.
- Call parking does not work to transfer calls to a conventional or analog phone.
- Call parking times out after two minutes. At that point, the person who parked the call will be called again.
- Anyone waiting on the parked call will hear music.
To park a call:
- Click on Transfer. If you do not see this option, click on the grey phone icon and then click Transfer.
- Click on Park the call at the bottom of the menu.
- You'll now see the number assigned to the call.
- Anyone using Skype for Business or Lync for Mac can enter the three- or four- digit number provided in the Skype for Business interface to pick up the call. You will receive a visual confirmation when they do letting you know who picked up the call and at what time. TIP: Click copy to copy the number. You could then initiate an instant message and paste the number into the message window.
- Click Retrieve to pick the call back up.
End a Call
When you’re finished with the call, click the red Phone button in the window, or just close the window.
Mac Make a Call
Call Someone Using a Phone Number
- From the Calls tab, enter the 10-digit phone number starting with the area code by selecting numbers or inserting your cursor on the line above the dial pad and entering numbers with your keyboard.
For best results:
- Use your keyboard’s number pad or copy and paste the number instead of clicking on the dial pad numbers on the screen.
- For international calls, you will still need to dial 011.
- Select the formatted number then, select the phone icon.
- When the call is accepted, use the audio controls to mute, unmute, and so on.
- When you’re finished with the call, select the red Phone icon, or just close the window.
Call a KU Contact Using the Desktop Software
- Find a contact or enter a person’s name in the search box, from the Contacts tab.
- Right-click on the contact.
- Select Start Call.
- Select the work number listed.
- When the call is accepted, use the audio controls to mute, unmute, and so on.
Answer a Call
When you receive a voice call, you will see and hear a notification on your computer, as well as your Skype-enabled phone if you have one. You can either pick up the phone if you have one or answer using your computer and headset.
TIP: If you are using your computer to answer calls, you should have your headset plugged into your computer in advance of receiving a call. It does not work to plug in your headset when you receive the call.
When someone calls you, an alert appears on your screen. If another KU contact who is video-enabled calls you, you will see a preview of your own video. Your video is only shared if you click on the video icon. To answer with just voice, select the blue phone.
- To answer a call, select the bluephone icon.
- Select the red phone icon to reject the call and send to voicemail.
- If you want to send future incoming calls directly to voicemail and receive no call notifications, change your status to Do Not Disturb.
End a Call
When you’re finished with the call, select the red phone icon, or just close the window.
Notifications and Call Ring Options
When you receive a call in Skype for Business, you will receive a visual notification in the middle of your the screen and an auditory notification through the device you're using. You can set a secondary ringer and choose to have calls simultaneously ring another number or co-worker so calls don't get missed.
TIP: Make sure your speaker volume is turned up to hear notifications.
Set Ringing Options
- Select Skype for Business from the top menu.
- Select Preferences.
- Select Audio/Video.
- In the Ringing dropdown, select Built-in Output to also have call notifications ring through your computer's speakers.
Forwarding Options
You can forward calls as you receive them to another number or delegate, and set up call forwarding and simultaneously ring so calls aren’t missed.
You can forward calls to another number or contact by setting up forwarding rules. Call forwarding is especially useful if you’re travelling or working from home because calls can be forwarded to your current location. If you’re out of the office, calls can be automatically forwarded to a co-worker.
You can set your incoming calls to simultaneously ring your phone and another number or contact in case you’re busy or momentarily unavailable.
Set up Simultaneously Ring or Call Forwarding
- With Skype for Business open, click on Skype for Business from the top menu.
- Choose Preferences.
- Choose Calls.
- Select the button by Turn on call forwarding and choose an option:
Forward My Calls
- Voice Mail – Sends calls directly to your voice mailbox where you can retrieve it later.
- New Number or Contact – Select a contact or type an eight-digit phone number in the search box and select OK.
Simultaneously Ring
- New Number or Contact – Select a contact or type an eight-digit phone number in the search box and select OK.
Things to note:
- You will receive call notifications when your status is set to Busy. Set your status to Do Not Disturb (DND) to send all calls directly to voicemail without notifications. All calls received while in DND will be logged in your Calls list and you will receive a missed call email in Outlook.
- You should have your headset plugged into your computer in advance of receiving a voice or video call request so you are always ready to receive calls and have time to put your headset on.
Skype-enabled Phone
Types of Phones
There are two types of Skype-enabled phones recommended: Polycom VVX 501 Touch Screen Phone and Polycom VVX 311 Button Phone. You should have one of the following models. Please note which model you have to know which instructions to follow.
View ScreenshotTypes of phones.
Make a Call
How to Call Someone Using a Phone Number
The best option for dialing is to enter the number and then pick up the handset to place the call. Or touch the green phone icon or physical speaker phone button to place the call using speakerphone.
- Enter the number using the keypad.
Note: It’s best to get in the habit of dialing the ten-digit number, starting with area code (###-###-####) like you would using a mobile phone. For international calls, you will still need to dial 011. - Pick up the phone’s handset to dial.
- To end the call, hang up the phone or select End Call using the touch screen or button under the option.
How to Call Someone by Contact or Username
- Find a contact by doing either:
- Select a favorite on your main screen by touching the contact or pressing the button beside the contact and lift the handset.
- On the VVX 501 (touch screen) phone, find anyone on your contacts list by lifting the handset, touching contacts, and swiping up to scroll through your contacts list. Touch the contact you'd like to call and touch "Dial."
- On the VVX 311 (button) phone, find anyone on your contacts list by lifting the handset and pressing the button under contacts. Use the physical navigation disk to scroll down to your contact and press the button under "Dial."
Note: Both favorites and contacts are set up through the desktop software interface. See below.
- To end the call, hang up the phone or select End Call using the touch screen or button under the option.
Answer a Call
How to Answer a Phone Call a Skype for Business-enabled Phone
- When you receive the call, you can pick up the phone's handset. Or, to pick up using the speakerphone, select Answer using the touch screen or push the speaker button on the phone. Note: If you are already using the handset or speakerphone and press Answer, the phone will automatically use the mode you’re in and place the first call on hold.
- Select Reject using the touch screen or the button by that option to send the person to your voice mail.
- Select Forward using the touch screen or the button by that option to forward the call to another number. Enter the ten-digit number starting with area code (###-###-####) to forward the call. See forwarding for more options.
- To ignore the call without sending it to voice mail, select Ignore using the touch screen or using the button by that option.
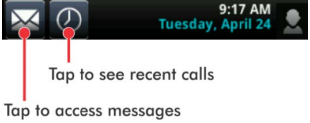
How to View Missed Messages on Your Skype for Business-enabled Desk Phone
- Touch the home button to view the home screen.
- You will see a small red number on the phone icon.
- Select the phone icon and then select recent to see missed calls.
End a Call
Hang up the phone or select End Call using the touch screen or button under the option.
Clear Call Logs
On the Polycom VVX 501 phone
- Touch the clock icon.
- Touch the trash can.
On the Polycom VVX 310 (button) phone
- Using the physical navigation disk on the right side of the phone, press the down arrow.
- Press the home button twice.
- You should return to the home window, and your missed calls should be cleared.
Mobile App
Making calls and answering in the Skype for Business mobile app is a matter of finding the contact and choosing whether to call with video or voice. With the mobile app, you are not able to add new contacts to your list; just call existing contacts.
iPhone
- Start typing a person’s last name in the search box. Your search results will appear below the box. You can also scroll through your Skype for Business Contacts group to find the person you’re looking for.
- Click on the contact's name
- Click the phone or video icon in the top right corner
iPad
- Tap Contacts in the left navigation.
- Start typing a person’s last name in the search box. Your search results will appear below the box. You can also scroll through your Skype for Business Contacts group to find the person you’re looking for.
- Click on the contact
- Click the video or phone icon in the top right corner
Android and Windows Phone
- Tap Contacts in the top left
- Search for and click the contact
- Click the video or phone icon in the top right corner
Skype Meetings
Voice and Phone Calls
You can use the Skype for Business desktop software to make calls to people both internal and external to KU. When you call others that are using Skype for Business, you will have full access to the Skype meeting features including video, screen sharing, and chat. When making calls to external phone numbers, you will only have access to call features including, hold, transfer, and mute.
PC Making Calls
Call by Contact or Username
- Find a contact or type a person’s name in the search box.
- Click on the contact's picture.
- Do one of the following:
- Click the Phone icon.
- Click the arrow next to the Phone icon and select a number.
Call by Phone Number
- From the contact or phone view, enter the phone number in the search box as the 10-digit number starting with the area code.
Note: For international numbers, enter the number as you would on a cell phone (011 ### phone number). - Press enter on the keyboard, or right-click and select Call.
- When you're finished with the call, click the red Phone button in the window to hang up, or just close the window.
Answering Calls
When you receive a voice call, you will see and hear a notification on your computer, as well as your Skype for Business-enabled phone if you have one. Where you answer the call will determine your audio device.
How to Answer a Phone Call
When someone calls you, an alert appears on your screen.
TIP: You must have your headset plugged into your computer in advance of receiving a voice or video call request. It does not work to plug in your headset when you receive the call.
- To answer the call, click anywhere in the blue area.
- Click Ignore to reject the call and send to voice mail.
- Click Options to do other actions:
- Send the call to Voice Mail.
- Click Mobile or Home to redirect the call. Note: You must first set up your mobile and phone numbers within Skype for Business to see this option.
- Reply by IM to send an instant message reply instead of audio or video. Note: If the person can’t receive an instant message because he/she doesn’t have Skype for Business launched, you will see a notification.
- Set to Do Not Disturb to reject the call and avoid other calls.
Call Ringing Options
There are a few options you can take advantage of to better hear and receive your calls. These include:
- Setting up a Secondary Ringer - incoming call notifications will play both on your headset and a secondary device that you choose.
- Setting up Call Forwarding - incoming calls will be forwarded to another number, contact, team, or go to voicemail.
- Setting up Simultaneous Ring - incoming calls made to your number will ring at your headset and computer speakers
You can choose for call forwarding and simultaneous ring to occur:
- All the time (default), or
- During work hours (set in Outlook).
You forward incoming calls by setting up forwarding rules. You can forward calls to:
- Voicemail, or
- Another number or to another contact, or a
- Delegate
You can also choose to delay the simultaneous ring so that it first rings for 5-10 seconds before ringing at another number, delegate, contact, or team.
Set-up a Secondary Ringer
If you have a headset plugged into your computer that you use occasionally for voice and video calls, you might miss audible notifications of incoming messages. When you set up a secondary ringer, the notification sound will play on both your headset and your device of choice, most likely your computer speakers.
- Launch Skype for Business.
- In the lower left corner of the interface, click on the drop-down by the icon with your audio device. Select Audio Device Settings.
- Toward the bottom of the panel, select the check box by Also ring and make sure your speakers are checked.
- Click OK to save.
Forwarding Calls
You have the option of forwarding all calls or individuals calls as you receive them to another number, such as your mobile phone. This is completely optional and is up to your discretion as it could involve your personal device and your personal phone plan.
Forward All Calls to Another Number:
- In the Skype for Business interface, click on the settings (gear) icon.
- Choose Call Forwarding from the left column.
- Choose your call forwarding option.
- Forward calls to will send all calls to the option chosen. Those calls will not "ring" on your machine.
- Simultaneously ring will make it so the calls ring both through the Skype for Business desktop software and the other option you choose.
- Optionally, you can choose to apply the settings:
- All the time
- During work hours set in Outlook
- Click OK to save the changes.
Forward Individual Calls to Another Number:
To forward individual calls to another number, you'll need to first set up the number (or numbers) in the Skype for Business desktop interface.
To Set Up Additional Numbers
- In the Skype for Business interface, click on the settings (gear) icon.
- Choose Phones.
- Choose the type of phone using the button and type the number. Enter it as the 10-digit number starting with the area code.
- Optionally, choose whether or not to show the number on your contact card (viewable to anyone using Skype for Business).
- Click OK to save.
Forward an Incoming Call
- When you receive a call, a notification will appear in the lower right corner of your screen.
- Click Options and choose the number that you'd like to forward the call to.
- The call will be forwarded.
Turn Off Call Forwarding
Select the call-forwarding drop-down menu and select Turn Off Call Forwarding.
Call Control Options
Audio Control Options During a Call
The call control options (Hold, Transfer, Devices, and number pad) should automatically appear in the middle of the call window when on a call with an external number. If you are on another call with someone at KU using Skype for Business, you may need to click on the grey phone icon to see those options.
How to Use the Audio Control Options:
- Use the dial pad to enter digits during the call to interact with voice-prompt menus.
- To put the call on hold, click Hold.
- To Mute, click the microphone button.
- To send the call to another number or park the call, click the Transfer button and select a contact or type a name or 10-digit phone number starting with the area code.
- To switch to a different device that is either connected to your computer or a built-in audio option, click the Devices button. Note: This option does not work to transfer a call to a Skype-enabled desk phone. You'll want to use Transfer > Park for that.
Transfer a Call
You can transfer a call to another contact at KU or to another number. An additional option you'll see when transferring is parking a call (more information below).
To transfer a call
- Click on Transfer. If you do not see this option, click on the grey phone icon and then click Transfer.
- Select a contact, or look up someone at KU by entering their last name followed by a comma and then first name in the search box, or enter the 10-digit phone number starting with the area code in the search box.
- Select the contact or number and then click Transfer.
Park a Call
When you park a call, the call is placed on hold and you are provided a three- or four-digit number that anyone using Skype for Business can use to retrieve the call. It can be a useful option if you want to switch from your headset that is connected to your computer to a Skype-enabled desk phone or if you pick up a call at the front desk and need to move to another workstation to continue the call. A few notes about parking:
- Only people using Skype for Business on PC or using a Skype-enabled desk phone can park a call.
- Only people using Skype for Business on PC, Mac, or a Skype-enabled desk phone can retrieve a parked call.
- Call parking does not work to transfer calls to a conventional or analog phone.
- Call parking times out after two minutes. At that point, the person who parked the call will be called again.
- Anyone waiting on the parked call will hear music.
To park a call:
- Click on Transfer. If you do not see this option, click on the grey phone icon and then click Transfer.
- Click on Park the call at the bottom of the menu.
- You'll now see the number assigned to the call.
- Anyone using Skype for Business or Lync for Mac can enter the three- or four- digit number provided in the Skype for Business interface to pick up the call. You will receive a visual confirmation when they do letting you know who picked up the call and at what time. TIP: Click copy to copy the number. You could then initiate an instant message and paste the number into the message window.
- Click Retrieve to pick the call back up.
End a Call
When you’re finished with the call, click the red Phone button in the window, or just close the window.
Mac Make a Call
Call Someone Using a Phone Number
- From the Calls tab, enter the 10-digit phone number starting with the area code by selecting numbers or inserting your cursor on the line above the dial pad and entering numbers with your keyboard.
For best results:
- Use your keyboard’s number pad or copy and paste the number instead of clicking on the dial pad numbers on the screen.
- For international calls, you will still need to dial 011.
- Select the formatted number then, select the phone icon.
- When the call is accepted, use the audio controls to mute, unmute, and so on.
- When you’re finished with the call, select the red Phone icon, or just close the window.
Call a KU Contact Using the Desktop Software
- Find a contact or enter a person’s name in the search box, from the Contacts tab.
- Right-click on the contact.
- Select Start Call.
- Select the work number listed.
- When the call is accepted, use the audio controls to mute, unmute, and so on.
Answer a Call
When you receive a voice call, you will see and hear a notification on your computer, as well as your Skype-enabled phone if you have one. You can either pick up the phone if you have one or answer using your computer and headset.
TIP: If you are using your computer to answer calls, you should have your headset plugged into your computer in advance of receiving a call. It does not work to plug in your headset when you receive the call.
When someone calls you, an alert appears on your screen. If another KU contact who is video-enabled calls you, you will see a preview of your own video. Your video is only shared if you click on the video icon. To answer with just voice, select the blue phone.
- To answer a call, select the bluephone icon.
- Select the red phone icon to reject the call and send to voicemail.
- If you want to send future incoming calls directly to voicemail and receive no call notifications, change your status to Do Not Disturb.
End a Call
When you’re finished with the call, select the red phone icon, or just close the window.
Notifications and Call Ring Options
When you receive a call in Skype for Business, you will receive a visual notification in the middle of your the screen and an auditory notification through the device you're using. You can set a secondary ringer and choose to have calls simultaneously ring another number or co-worker so calls don't get missed.
TIP: Make sure your speaker volume is turned up to hear notifications.
Set Ringing Options
- Select Skype for Business from the top menu.
- Select Preferences.
- Select Audio/Video.
- In the Ringing dropdown, select Built-in Output to also have call notifications ring through your computer's speakers.
Forwarding Options
You can forward calls as you receive them to another number or delegate, and set up call forwarding and simultaneously ring so calls aren’t missed.
You can forward calls to another number or contact by setting up forwarding rules. Call forwarding is especially useful if you’re travelling or working from home because calls can be forwarded to your current location. If you’re out of the office, calls can be automatically forwarded to a co-worker.
You can set your incoming calls to simultaneously ring your phone and another number or contact in case you’re busy or momentarily unavailable.
Set up Simultaneously Ring or Call Forwarding
- With Skype for Business open, click on Skype for Business from the top menu.
- Choose Preferences.
- Choose Calls.
- Select the button by Turn on call forwarding and choose an option:
Forward My Calls
- Voice Mail – Sends calls directly to your voice mailbox where you can retrieve it later.
- New Number or Contact – Select a contact or type an eight-digit phone number in the search box and select OK.
Simultaneously Ring
- New Number or Contact – Select a contact or type an eight-digit phone number in the search box and select OK.
Things to note:
- You will receive call notifications when your status is set to Busy. Set your status to Do Not Disturb (DND) to send all calls directly to voicemail without notifications. All calls received while in DND will be logged in your Calls list and you will receive a missed call email in Outlook.
- You should have your headset plugged into your computer in advance of receiving a voice or video call request so you are always ready to receive calls and have time to put your headset on.
Skype-enabled Phone
Types of Phones
There are two types of Skype-enabled phones recommended: Polycom VVX 501 Touch Screen Phone and Polycom VVX 311 Button Phone. You should have one of the following models. Please note which model you have to know which instructions to follow.
View ScreenshotTypes of phones.
Make a Call
How to Call Someone Using a Phone Number
The best option for dialing is to enter the number and then pick up the handset to place the call. Or touch the green phone icon or physical speaker phone button to place the call using speakerphone.
- Enter the number using the keypad.
Note: It’s best to get in the habit of dialing the ten-digit number, starting with area code (###-###-####) like you would using a mobile phone. For international calls, you will still need to dial 011. - Pick up the phone’s handset to dial.
- To end the call, hang up the phone or select End Call using the touch screen or button under the option.
How to Call Someone by Contact or Username
- Find a contact by doing either:
- Select a favorite on your main screen by touching the contact or pressing the button beside the contact and lift the handset.
- On the VVX 501 (touch screen) phone, find anyone on your contacts list by lifting the handset, touching contacts, and swiping up to scroll through your contacts list. Touch the contact you'd like to call and touch "Dial."
- On the VVX 311 (button) phone, find anyone on your contacts list by lifting the handset and pressing the button under contacts. Use the physical navigation disk to scroll down to your contact and press the button under "Dial."
Note: Both favorites and contacts are set up through the desktop software interface. See below.
- To end the call, hang up the phone or select End Call using the touch screen or button under the option.
Answer a Call
How to Answer a Phone Call a Skype for Business-enabled Phone
- When you receive the call, you can pick up the phone's handset. Or, to pick up using the speakerphone, select Answer using the touch screen or push the speaker button on the phone. Note: If you are already using the handset or speakerphone and press Answer, the phone will automatically use the mode you’re in and place the first call on hold.
- Select Reject using the touch screen or the button by that option to send the person to your voice mail.
- Select Forward using the touch screen or the button by that option to forward the call to another number. Enter the ten-digit number starting with area code (###-###-####) to forward the call. See forwarding for more options.
- To ignore the call without sending it to voice mail, select Ignore using the touch screen or using the button by that option.
How to View Missed Messages on Your Skype for Business-enabled Desk Phone
- Touch the home button to view the home screen.
- You will see a small red number on the phone icon.
- Select the phone icon and then select recent to see missed calls.
End a Call
Hang up the phone or select End Call using the touch screen or button under the option.
Clear Call Logs
On the Polycom VVX 501 phone
- Touch the clock icon.
- Touch the trash can.
On the Polycom VVX 310 (button) phone
- Using the physical navigation disk on the right side of the phone, press the down arrow.
- Press the home button twice.
- You should return to the home window, and your missed calls should be cleared.
Mobile App
Making calls and answering in the Skype for Business mobile app is a matter of finding the contact and choosing whether to call with video or voice. With the mobile app, you are not able to add new contacts to your list; just call existing contacts.
iPhone
- Start typing a person’s last name in the search box. Your search results will appear below the box. You can also scroll through your Skype for Business Contacts group to find the person you’re looking for.
- Click on the contact's name
- Click the phone or video icon in the top right corner
iPad
- Tap Contacts in the left navigation.
- Start typing a person’s last name in the search box. Your search results will appear below the box. You can also scroll through your Skype for Business Contacts group to find the person you’re looking for.
- Click on the contact
- Click the video or phone icon in the top right corner
Android and Windows Phone
- Tap Contacts in the top left
- Search for and click the contact
- Click the video or phone icon in the top right corner
Voicemail
PC: Record Greetings & Listen to Messages
Record Greetings
Personal Greetings
- In the Skype for Business desktop interface, select the Dial Pad icon.
- Click on the Voice Mail Options button.
- Select Change Greetings.
Out of Office Greetings
It is possible to pre-record a greeting to use when you are away for an extended period of time. Note: If you have a voicemail call answering rule (phone tree) enabled, callers who reach your voicemail will not hear either of your voicemail greetings.
In Skype for Business
- In the Skype for Business desktop interface, select the Dial Pad icon.
- Click on the Voice Mail Options button.
- Select Change Greetings.
- In the call menu, choose play orrecord a personal greeting.
- Choose record a greeting for when you're away.
- Follow the prompts to record and save your message.
In Teams
- In the Teams desktop client, select your photo or initials from the upper right-hand corner.
- Select Settings.
- Choose Calls.
- Select Configure voicemail.
- Select an option of when to play the out of office greeting.
- Select Record a Greeting.
- In the call menu, choose play orrecord a personal greeting.
- Choose record a greeting for when you're away.
- Follow the prompts to record and save your message.
From voicemail.ku.edu
Note: You cannot record a greeting from voicemail.ku.edu. However, you can create a text to speech greeting to be played as an automated message.
- Browse to Voicemail Settings.
- Log in using your KU Online ID and password.
- Select an option of when to play the out of office greeting.
- Enter your message under Customize your text-to-speed out of office greeting message.
- Choose Save at the top of the screen.
Check Voicemail
In Outlook
- Find and open the email with the voicemail message.
- Click the play button to listen.
In Skype for Business
- In the Skype for Business desktop interface, select the Phone icon.
- Voicemail will be listed at the below the dial pad.
- Hover over the presence icon, then click the play button to listen.
In Teams
- In the Teams desktop interface, select Calls from the left menu.
- Choose Voicemail.
- Select the voicemail message to play and read the text transcript.
Mac: Record Greetings & Listen to Messages
Record Greetings
Personal Greetings
In Teams
- In the Teams desktop client, select your photo or initials from the upper right-hand corner.
- Select Settings.
- Choose Calls.
- Select Configurevoicemail.
- Select an option of when to play the out of office greeting.
- Select Record a Greeting.
- In the call menu, choose play orrecord a personal greeting.
- Follow the prompts to record and save your message.
Out of Office Greetings
It is possible to pre-record a greeting to use when you are away for an extended period of time. Note: If you have a voicemail call answering rule (phone tree) enabled, callers who reach your voicemail will not hear either of your voicemail greetings.
In Teams
- In the Teams desktop client, select your photo or initials from the upper right-hand corner.
- Select Settings.
- Choose Calls.
- Select Configurevoicemail.
- Select an option of when to play the out of office greeting.
- Select Record a Greeting.
- In the call menu, choose play orrecord a personal greeting.
- Choose record a greeting for when you're away.
- Follow the prompts to record and save your message.
From voicemail.ku.edu
Note: You cannot record a greeting from voicemail.ku.edu. However, you can create a text to speech greeting to be played as an automated message.
- Browse to Voicemail Settings.
- Log in using your KU Online ID and password.
- Select an option of when to play the out of office greeting.
- Enter your message under Customize your text-to-speed out of office greeting message.
- Choose Save at the top of the screen.
Check Voicemail
Note: Wherever you check your voicemail, if you delete a message it will be deleted in all places.
Outlook
- Find and open the email with the voicemail message.
- Select the preview button to listen.
Skype for Business
- Select the Calls tab.
- Select Sign in under Sign into your Exchange account if prompted.
- Enter your KU Online ID and password and authenticate with Duo if prompted.
- Select Voicemail and click on a voicemail to play.
In Teams
- In the Teams desktop interface, select Calls from the left menu.
- Choose Voicemail.
- Select the voicemail message to play and read the text transcript.
Skype-enabled Phone
Types of Phones
There are two types of Skype-enabled phones recommended: Polycom VVX 501 Touch Screen Phone and Polycom VVX 311 Button Phone. You should have one of the following models. Please note which model you have to know which instructions to follow.
View ScreenshotTypes of phones.
Checking Voicemail
On the Polycom VVX 501 (touch screen) phone
- Touch the messages icon.
View ScreenshotMessages icon on VVX 501 phone. - Enter your voicemail pin and push the # button.
On the Polycom VVX 310 (button) phone
- Press the physical message button.
- Use the physical navigation disk to select a message. (Note: You may want to increase the screen contrast using the directions above.)
- Select the button under Play to play the selected message.
- To delete the message, Select the button under More and then the button under Delete.
- To mark a voicemail as "Read" which will discontinue the phone's light from flashing, select the button under "Read."
Mobile App
Check Voicemail
- Launch the Skype for Business app.
- Touch thekeypad icon.
- Touch thevoicemail icon.
- Touch the message to play.
Microsoft 365 Updates & Tips
Support
Technical Support: itcsc@ku.edu | 785-864-8080
Training Support: training@ku.edu | 785-864-5155